As the spotted sea trout season gets under way I want to share some information on my reel and rod setup that I think is important. This information is for experienced anglers or those working to improve their skill level. I am going beyond the gear to provide more detail on how to squeeze as much distance as you can from each cast. Its a fact that you can only catch fish when your lure is in the water! So the longer your lure is in the strike zone for each fish it passes the more likely you are to get a strike.
For all of the components mentioned below there is one goal and one goal only….Eliminate FRICTION! Friction is the enemy of distance because it is created by resistance through any type of contact. Over the years of fishing for bass, crappie, sea trout, reds, etc… I have always had problems with distance caused by friction. In this blog I will reveal my tricks to help you get more distance out of each cast for Spotted Sea Trout. The closer you can get to my recommendations the further you will cast and catch more fish. In summary its important to have the knowledge to match up the reel, the rod and the line to get maximum distance from each cast. My hope is that the information below will help you do that.
THE ROD
If you recall from middle school science class a stick is also known as a lever. The longer the lever the more leverage you have to lift a heavy weight or impart a heavy load. The same is true with a fishing rod. The longer the rod the more force you can exert on the lure and get more distance. My standard for a casting long distance is a spinning reel with a 6’6″ to 7′ rod. Medium-lite with a fast action tip. This means the top 1/3 of the rod is “whippy” and the bottom 2/3 is stiff but will allow a slight bend. Most rods of this type are limited to a 1/2oz lure. Throwing anything heavier and you run the risk of stressing the rod beyond its capability. For my setup I use a 6’10” St. Croix Mojo Bass. It has the casting characteristics needed and seems to be more sensitive than their inshore version. I am not sure why but I can feel the “tick” from a sea trout during the winter bite better than any other rod…including the St. Croix Inshore! These rods are expensive though. Another version of this rod type is the Fenwick HMG. I have two that are 6’9″ and I use them for lighter more smaller lures when chasing reds at low tide in shallow water. The Fenwick setup is mostly used in the late fall/early winter when the bait are predominately smaller. Either of these rods will work for casting long distance depending on your lure size.
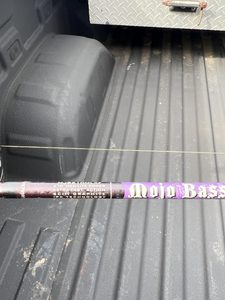
These rods also have a long handle to give more leverage on the bottom end of the rod. The long handle is important to give you the most leverage when casting long distance.
THE REEL
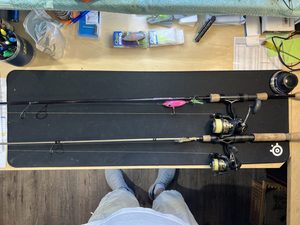
Everything that I am going mention beyond this point assumes that you always have your reel in a certain position. The position is called First Position. This is important because it establishes a basis for everything used to measure and align for reducing friction. Below is a picture that shows what First Position looks like for a reel. The bail wire is on the handle side, the line roller and bail arm are closest to the rod.
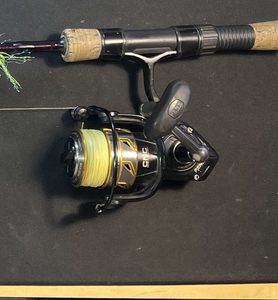
Pairing the correct size reel to the rod is VERY important. For casting the Killers I use a medium-lite fast action rod with a 2000 to 3000 size reel. Its possible to go smaller than a 2000 but you are going to lose distance because of the smaller spool. More line will empty out sooner and go deeper into the center of the spool causing more friction than normal against the spool. There are two things that I look for when pairing my reel to a rod. (1) the spool must be angled and pointed toward the first eye. (2) with the reel in First Position the line should be parallel (as much as possible) to the rod. Below are pictures to help explain what I look for when pairing a setup.
#1 – Take a look at the picture below. There are two yellow lines drawn on top of the rod handle and center (yaw) of the reel. Notice the converging angles from right to left. With this design the spool is pointed toward the first (largest eye) on the rod. This is very important because this helps reduce the friction generated by the first eye as the line pass through. Not all spinning reels are designed this way. There are some reel brands that are not angled. When purchasing a reel you should look for this by grabbing any rod available to assess the angle like the picture below. Never buy a reel without putting it on a rod similar to the one you are going to use for sea trout. Once you find a reel brand that does this stick with it!
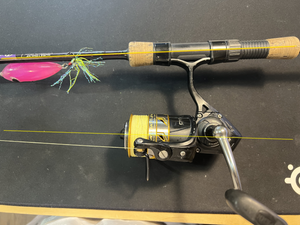
#2 – Another way to make this assessment is to look at how parallel the line is to the rod and spool alignment to the bottom of the first eye. The top edge of the spool closest to the rod should be in-line (or close a possible) with the bottom of the first eye. See green line in the picture below. It does not have to be exact but at least within 1/4″. A measuring tape will confirm this so have one with you when shopping. I have yet to find a reel and rod setup where these point align. Another way is to use a reel in First Position with line on it. See picture below. The line is almost parallel with rod and it makes it easier to compare the spool edge with first eye. Again, find a reel brand that does this and stick with it!
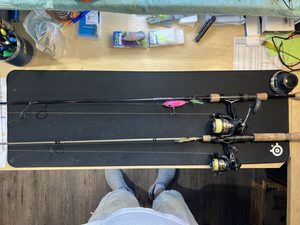
One more item to cover is to make sure your line does NOT touch the top of the inside of the first eye with the reel in First Position. To fix this simply bend the eye forward toward the tip until the line does not touch the top of the inside. I have to check mine regularly while fishing since the rods bounce around more in an aluminum boat. The line may touch the top of the inside of the eye when you place the line in your index finger preparing for a cast. This is expected but will not cause friction by contact when casting. You should also check the second eye and adjust it if possible. Some rods have eyes with braces on both sides. You will not be able to adjust the first eye with this type of eye design on a rod.
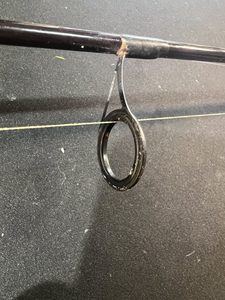
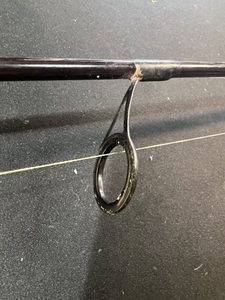
Here is another example of a reel and rod pairing using my Fenwick HMG. Notice the difference in the size and placement of the first eye on the HMG. The best reel for this rod is 1000 to 1500 due to the alignment of the spool edge with the bottom of the first eye. This setup is using 10lb braid and almost throws just a far as my St. Croixs with a 1/16oz Voodoo! Note the Penn 1000 is not aligned with the first eye as much as I would like for it to be. But it does great with the 10lb braided line. Anything thicker would reduce the distance. I am shopping for another 1000 size reel that would put the spool closer to alignment but haven’t found one yet. This setup is perfect for reaching reds crawling on their belly in shallow water without spooking the school.
And I would never put my 2000 or 3000 size reels on the HMG due the spool top edge being much lower than the first eye. I tried it and I could not throw the Voodoo as far as I could with the 1000….and I heard a different sound as the line passed through the first eye. It was beating against the rod before it passed through the first eye.
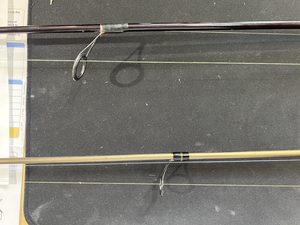
THE LINE
The next component to cover is the line and the amount of line on your reel. I keep two casting rigs with me when fishing for sea trout. One with 20lb braid/6lb diameter. And one with 10lb braid/2lb diameter. To get maximum distance your line diameter must remain small. The smaller the better. But go too small and you risk breaking the line and losing a big fish. So find a balance to your liking. For me it’s the 6lb and 2lb diameter braids. Focusing on the amount of line, take a look at the picture below with the red arrow. I stop adding line once the line is ~1/8″ from the top edge of the spool. Experienced fishermen who see this will poo poo on my advice and with good reason…normally this much line will result in multiple wind knots, tangles and drive you crazy! However I have found that this is not the case with Power Pro Slick V2 and using my recommendations above. Slick V2 has a slicker feel (less friction) and does not kink when the line loops up on itself. On some braids a tight kink will weaken the line.
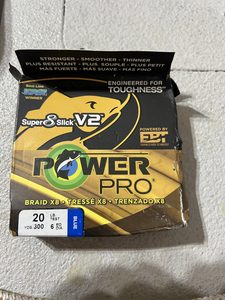
The older the braided line is the better! If you notice the line on the reel in the picture is faded. This line is about 2 years old. I normally get six years out of my line on all of my reels. On the third year I will flip the line and get three more years out of it……I can provide more info on how to flip your line in another blog if there is interest. Full dis-closure, you will get a few wind knots with brand new Slick V2 so I intentionally back off on the force used to cast with new line. It only takes ~10 minutes of casting before the line is ready for a fully loaded power cast.
The smaller diameter braided line will definitely cast farther than the thicker line. But you risk losing that gator trout with a weaker line so make sure you have your drag properly set for 10lb braided line. Typically the drag should be 20 to 30 percent of the lb test. Smaller line also allows your lure to maintain a deeper depth while retrieved. The fast sinking Killer will run 6′ to 8′ with 2lb braided line depending on how slow you work the twitch and pause.
The other factor that helps eliminate knots with this much line are the recommendations above on pairing the reel and rod properly. Any friction against that first eye is going cause line to balloon out between the first eye and the spool. This is how the line wraps over its self coming off the spool and through the eyes of the rod.
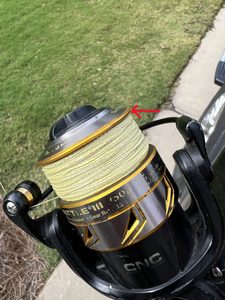
Also note the thin edge of the spool (red arrow)…this means less friction as the line unravels across the top. Some spools have a thicker beveled edge which means more contact with the line as it unravels over the top. More contact means more friction and reduced distance.
Another tip to mention is to manually flip the bail wire with your hand after casting. This reduces the chance of the line looping over the top of the spool. See picture below. This is what can happen when you start reeling after a cast without flipping the bail wire yourself. Without realizing this has happened, your next cast is going to result in a tangled mess with the line looping on itself coming off the spool. This usually happens when the lure is zooming through the air at full force. I had to force myself to flip the bail when starting out with braid until it became a habit.
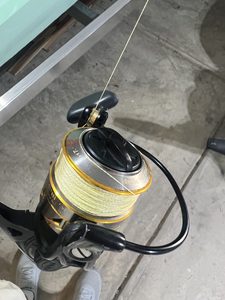
THE KNOT AND PLACEMENT
I also have to mention the knot used for splicing your leader. Its very important to have a monofilament or fluorocarbon leader tied to your braid especially when fishing clear water. Salt water on the Carolina coast clears up in the fall/winter months. For me I always tie an FG Knot. But there are plenty of other good basic splicing knots to tie. Just remember to retie after a long day of fishing or after fighting a large fish. Unfortunately the knot you tie can rob you of distance but you can reduce the impact significantly. First, if you tie an FG knot or something similar keep the length of the knot to about 3/8″. Any longer and it will drag more as it enters each eye on the rod when casting causing friction. Secondly, pay attention to the length of the leader and where it places the knot when you setup for a cast. The absolute best leader length is one that keeps the knot out of the rod eyes completely. However this means you don’t have enough length to retie your lure throughout the day. So there is a trade off in my recommendation. For me I start with a leader the length of the rod tip up to the spool. Once a lure is tied on it puts the FG knot between the first and second eye on the rod and leaves two to three feet hanging off the tip. See blue circle in the picture below.
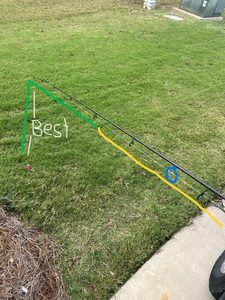
Its hard to see in the picture but the FG knot is between the first and second rod eye.
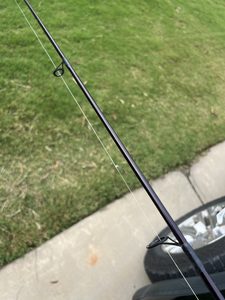
The absolutely worst place for the knot to land is on the spool. When the line unravels over the top of the spool the weight of the knot will increase from the centrifugal force as it spins off. This then causes the line to “balloon” out between the spool and the first eye. And to further compound things this increases friction as the knot enters the eyes from the force of the cast and typically causes twisted knots.
I hope this information helps you increase casting distance and catch more fish! Send me some pictures of your catch!
Please let me know if you have any comments or questions using the message box near the bottom of my website.
Tight lines everyone!
Mark Ingle – Fang Lures